Thursday, August 30, 2007

Mega Botanical Press

If you are one of my three regular readers (bless your heart!), you may remember my "How does one press this?" post where I discovered alocasia (elephant ear) leaves. I was determined to grow them here in Wisconsin, so that I could try pressing their remarkable leaves.
Well, so far, so good! The alocasia bulb I bought has thrived, and the foliage has been spectacular. The picture above is the first leaf I harvested, along with my improvised press. The wood is actually laminated shelving (approx. 18" x 24"), and I've used large pieces of fiber fill quilt padding and felt as the filler.
To hold the press together, I've used ratchet clamps, which can be made tighter as the leaf shrinks.
I'm guessing that it will take about two weeks until the leaf is fully dry. I hope it works. Stay tuned!

Labels: , ,

Tuesday, August 28, 2007

leaf petals


A few weeks ago I quietly launched my second website, called leaf petals. At this point it’s still a small site, but I’m excited about it because it will enable me to eventually branch out in other “botanical” areas I’m interested in, such as nature printing, botanical cyanotype prints, and it’s a good venue to showcase my new line of cards called “leaf mosaics.”

By having another site, I won’t be “diluting” Elizabeth’s Flowers with non-pressed flower items; therefore it will hopefully (God willing) continue to rank well in Google for pressed flower cards, art, etc. Do you have a website you’re working on? One day next week I’ll be blogging about how I got started in my web business, and will share some valuable online resources that proved to be wonderful blessings to me along the way. In the meantime, have a quick peek at leaf petals!

Labels: ,

Thursday, August 23, 2007

Oshibana


Thursday nights are “my nights." I am off limits to all kids, husband, and pets once the supper dishes have been cleared, and I set up my laptop in the living room, grab two or three diet cherry 7-ups, and “work” on the computer until the wee hours of the morning. Sometimes I do much needed updates on my web sites and answer e-mails, but more often than not I do what I like to call “necessary marketing research." I surf.


Last night I came across this site while googling “oshibana” which is the Japanese art of making pictures with pressed plants. If you click your way through the menu down the center of the page, you’ll see quite a refreshing array of pressed flower art. I don’t really care to make pictures with pressed plants as the oshibana purists do, (I prefer a more “botanical” art style), but I admire the amazing talent and creativity of these artists.


This is the picture that I found most the inspiring on the site. I love how they put a translucent orchid on top of what looks to be a poem. That gives me an idea…

See, “necessary marketing research” is a valuable way to spend one’s Thursday night. Try it sometime.

Labels: ,

Monday, August 20, 2007

The lazy rainy days of August

We are having the most unusual August in my corner of Wisconsin. Sadly much of Wisconsin remains in drought conditions, but the southern border where I live has been skimmed by an almost continual parade of heavy rain storms over the past month. My yard is as lush as it is in May – the grass is a dazzling emerald green, when usually by this time it is a tired brownish “army green.” The most spectacular result of all this rain is the corn. The cornfield that borders my backyard towers above us and, according to the paper, has reached record heights. It’s as if there is a tall green living wall fencing us in.

I’ve been doing a bit more internet surfing lately (which I blame on the rain) and came across a wonderfully inspiring site dripping with creativity. I’ve only begun to explore it, but I wanted to share it with you – just in case it’s raining where you are too.

http://practicallycreative.net/ Be creative today!

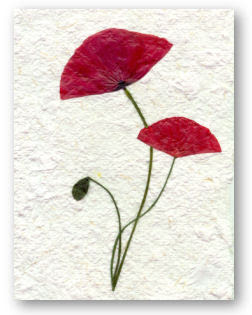
The red poppies above are one of three pressed flower pictures I recently created for a customer, in honor of her new baby.

Labels: ,

Thursday, August 16, 2007

Over 50 Ways to Use Pressed Flowers


Here are 52 ways to use pressed flowers:

1. art
2. jewelry

Use pressed flowers to decorate:

3. knobs/dresser hardware
4. night lights
5. handmade paper
6. trivets
7. paper weights
8. decorative bird house
9. antique watering can
10. decorative plaques

Read about 42 more ways to use pressed flowers!


Labels:

Wednesday, August 15, 2007

It's time to make herb butter!

If you haven’t done so already, now is the time to make herb butter. If you’ve never had herb butter before, I promise you – you are in for a treat!

Using herb butter really kicks a person’s cooking skills up a notch. I use herb butter on cooked vegetables - even corn on the cob, fish, pasta, grilled chicken or steak, and of course on really on really good bread. I also use a pat in the pan when cook omelets, or for sautéing different things such as shrimp.

Harvest your herbs in the morning after the dew has dried, gently wash them and allow them to dry. You can carefully blot them dry with a towel, or place them in a salad spinner to speed things along.

Here’s a very basic recipe for herb butter to get you started:

Herb Butter
makes about 1/2 cup (equivalent of 1 stick)

1/2 cup (1 stick) unsalted butter, softened to room temperature (you may use regular, salted butter if you wish, just eliminate the sea salt)
1/4 cup finely chopped mixed herbs (such as basil, thyme, sage, parsley, dill, chives, tarragon, oregano, marjoram or rosemary)
1 teaspoon coarse sea salt

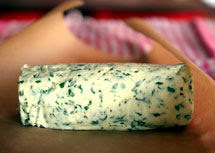
In a small bowl, combine all ingredients. Mix well until herbs are distributed evenly. Place mixed butter on a piece of waxed paper or parchment, shape into a cylinder or disk, and seal ends by twisting. Chill in refrigerator until firm, at least an hour.

Herb butter keep in refrigerator for about 2 weeks and in the freezer for several months.

Here are some of my favorite herb butter combinations:

*Italian: oregano, basil, parsley and chives

*Chives and parsley: especially great for steak, or baked potatoes

* Pesto butter: just basil, with a bit of grated parmesan cheese - absolutely decadent on tortellini pasta!

* Dill and parsley: wonderful on green beans, and other veggies.

* all purpose: I use just about all my herbs – chives, basil, oregano, thyme, parsley, tarragon, rosemary, and a tiny bit of sage.

Here’s one more hint for you. For the ultimate herb butter, use fancy European butter. In my grocery store I can sometimes find Irish or Scandinavian butter. Herb butter made with these decadent butters is out of this world, and is worthy of your best home baked sourdough bread.

Do you have a favorite way to use herb butter?

Labels: ,

Monday, August 13, 2007

Forever

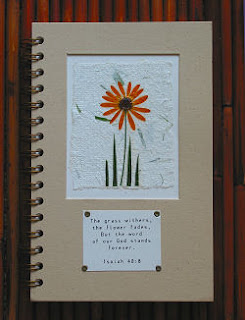
Isaiah 40:8

The grass withers, the flower fades, but the word of our God stands forever.

It’s true. The flowers will soon be gone, and the green grass as well. How comforting to know that God and His Word will never fade.

Speaking of God's word – want to get to know it better? You should.

There is a simple yet very effective scripture memory tool called: BibleMemory.us
Sign up, and you’ll receive a daily email with a personal link to the verse of the week.
The first day you just read the verse, but then the following day one of the words is missing, and you need to fill in the blank. On consecutive days you eventually fill in more and more of the blanks, until you have learned the entire verse. It’s really a fun and painless way to learn scripture!

Above is a picture of one of my new blank botanical journals. This one has an orange osteospermum on my handmade grass paper.

Labels:

Friday, August 10, 2007

An Herbal Arrangement


Here’s one last short but sweet entry today for the “Flowers in the Home” series: Herbal Arrangements.

I grew herbs in my garden for years, but rarely used them. Often times I would be just about done preparing a meal when I realized that I could have put some basil in this, or thyme in that, or chives on this. A few years ago, I came upon an article in a magazine which had pictures of small bowls of snipped herb bouquets – they were adorable, and I immediately made one of my own. The whole point of the article was that if you keep a fresh herb bouquet in your kitchen, not only does it look inviting, you will be much more likely to incorporate herbs into your cooking.

Here’s how to do it:

* Select a colorful variety of herbs: basil, oregano, a bit of sage, thyme, chives, and any other herb that’s that you might have. If you grow nasturtiums, their edible flowers would add a wonderful burst of color. If you don’t have your own herbs, fresh herbs from the produce department, or farmer’s market will do just fine.

* Wash the herbs well, and gently shake off the excess water.

* Select a small bowl, add cool water and place the herbs inside. A vase could also be used, but it is easier to gently tug a sprig or two of herbs from a loose arrangement in a bowl, than a tighter arrangement from a vase.

* Keep the bowl on your kitchen counter by day, and place it in the refrigerator at night. Change the water daily, and the herbs will stay fresh for days. Replace with new sprigs as needed. Don’t throw away old sprigs, put them in the garbage disposal enjoy their delightful scent.

Now, don’t forget to use them! I’m off to enjoy an omelet with fresh basil and chives.

It's been fun to be a part of the 2007 Finishing School this week. I'm grateful for the opportunity, and hope you've been inspired to bring more of God's beauty into your home.

"...the beauty of each blossom speaks silently of God's love..."


Labels: ,

Thursday, August 09, 2007

Flowers in the Home

Yesterday we looked at making table centerpieces, and today in our “Flowers in the Home” series we will look at ways to bring flowers/plants into other areas of our home.

Although it’s not a flower, one of my favorite ways to bring “the outside in” is with ivy –it’s almost indispensable. I have a regular, common ivy plant, as well as a variegated type, and one with larger heart shaped leaves, and use them all through out my house. Since ivy cuttings can survive for months in water, I place cuttings in decorative glass bottles or small vases and place them anywhere a touch of green freshness is needed, such as in the bathroom, on my computer desk, in my studio, and even in a gloomy corner of a large bookshelf. Once a cutting develop a copious amount of roots, pot it up (and give it to a friend), toss it in the compost pile, or in the spring, they can be added to your container plantings.

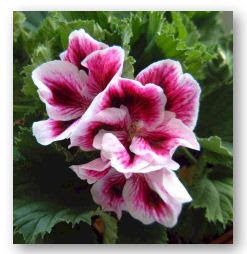
Another beneficial plant (with flowers this time) is the scented geranium (see above picture). They can be somewhat difficult to find, and a little pricey, but worth every penny. There are many varieties, but the rose scented varieties are among the best. Place one on the front step, or anywhere someone can brush against it and release its wonderful scent as they pass by. The leaves can be dried and used in potpourri, or pressed and used to scent stationary.

This is kind of off today’s topic, but I also wanted to mention a few strategies to use when buying flowers from the florist, since many of us aren’t blessed with flowers in our gardens year round. The most important thing I’ve learned is this: make friends with your local florist! Florists often have to guess the needs of their customers at any given point in time, and often times they have too much of this, or that. Once your florist gets to know you, they likely will be willing to give you special deals on their extra flowers.

When buying flowers from the florist, carnations are always a smart buy. If the water is changed at least every other day, and you occasionally re-cut the bottom of their stems at an angle, they will last up to 3 weeks. Also, don’t overlook foliage. I bought some large pieces of “silver leaf” eucalyptus from my florist last winter, and it lasted well over two months – and it looked very dramatic in my entrance way.

Finally, edit your bouquets as needed. As one type of flower fades, replace them with other flowers, or remove them and place the remaining flowers in a smaller vase – it will look like you have a brand new bouquet!

Tomorrow: Fragrant Herbal Arrangements

Labels:

Tuesday, August 07, 2007

Flowers in the Home: Centerpieces and Place Settings


Today’s “Flowers in the Home” Installment features a random list of centerpiece and place setting ideas. If you have an idea of your own, please feel free to share it with us!

Table Centerpieces

- should basically be fragrance free
- relatively short: below each person’s eye level
- should not to be too expansive – to avoid overcrowding the table.

A few ideas:

- Seasonal fruit or vegetables, or even large seed pods, in a decorative bowl: there can be a colorful variety of items, or a monochromatic look (i.e. a bowlful of lemons) is even more dramatic. For something really different, try some of the new and interesting winter squash varieties seen at your local farmer’s market.

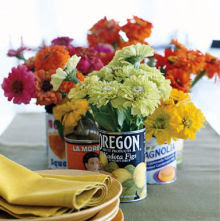
- A series of small bouquets in unusual containers, going down the middle of the table, such as cans (see above picture) or tea cups.

- a basket of dried flowers, arranged as a bouquet, or with long stems tied together, lying in the basket.

- a clear glass bowl, with several flower blossoms floating on top.

- a large handful of dried grasses or grains, cut the same length, about 8”-10”and tied together with a decorative ribbon. If you twist the stems in the same direction before tying them, they kind of flare out like a fan and should stand up on their own.

Individual Place Setting Embellishments:

By placing individual vases or place cards at every plate, you help each person feel welcome and valued.

- Pick up some inexpensive glass votive candle holders from the dollar store, and place a single elegant flower in each “personal vase”. Or, an ivy sprig, or several colorful hosta or heuchera leaves.

- Create individual place cards. For each person, fold a small white index card in half, write their name on the card, and embellish with a pressed flower . If you need a really good flower press, you can find one here, or here. (Shameless plug).

- In the fall, press large, colorful leaves in a phone book about a week or so before you need them (or use the flower press mentioned above). Once pressed, write each person’s name on the leave with a good quality gold, bronze, or copper metallic marker, and place a leaf on each person’s plate. This was a big hit at our house last year at Thanksgiving. By the way, pressed leaves also look nice discreetly taped on a mirror in the entrance way, or on a front door window.

- Finally, browse through Better Homes and Gardens, or a similar women’s magazine. They are loaded with examples of centerpieces – even the advertisements!

Labels: ,

Monday, August 06, 2007

Growing a Cutting Garden

Many gardeners grow flowers to create fresh bouquets for their homes, or to give away to friends, but they also want to be able to enjoy the beauty of their garden itself. In my case, I need to be able to harvest many of my flowers for my pressed flower business. Can one have it both ways?

Well, yes and no. The ideal solution is to have a cutting garden – a utilitarian flower garden dedicated solely to the production of flowers.

A cutting garden is ideally placed in a side yard or someplace generally out of site. Because this is a production garden, design correctness isn’t as important as making sure flowers are placed as close together as they can tolerate, and that they receive an optimal amount of daily sunshine.

Set up your cutting garden as you would any garden, in a well drained location with plenty of peat moss and soil amendments as. I use my vegetable garden as my primary cutting and pressed flower garden. Some of the flowers weave in and out of the vegetables, and the flowers end up beautifying the vegetable garden, yet they aren’t missed when I’ve cut them. If you have a separate dedicated space, plant your flowers in long narrow rows, for easy harvesting. It’s also a good ideas to plant annuals in succession, with early season, mid-season, and late season bloomers each grouped together – just read your seed packets to determine what blooms when. To encourage flower production, pick blossoms regularly. Remove faded blossoms (called deadheading) as this prevents them from forming seeds, which slows down flower production.

Your choice of what to plant is almost limitless, but as a rule, long-stemmed annuals and perennials make the best cut flowers. Include some foliage plants for texture and color in arrangements and floral bouquets.

Your local university extension office can give you a list tailored for your location, but here’s a brief list of flowers that I have found to work well here in Wisconsin.

Annuals: zinnia, cosmos, small sunflower, larkspur, calendula, pansies, statice, sweet pea, scabiosa, baby’s breath, strawflower, celosia, dianthus

Perennials: black-eyed Susan, yarrow, coneflower, huechera, delphinium, Russian sage, Shasta daily, foxglove, asters, and mums.

Foliage: hostas, artemisia (silver-leafed varieties), coleus, lavender, dusty miller, and lamb's ears.

In case you might be interested, here's a list of flowers that press well.

Tomorrow: Centerpieces and place settings.

Labels: ,

Simple flower Arranging

I’d like to extend a warm welcome to our visitors from the online Finishing School today.

I’ve been blessed with the opportunity to cover the topic of Flowers in the Home, and today we’ll begin with simple flower arranging.

In all honesty, I believe flower arranging is something you are already good at. Even children are amazingly good at it, but I want to remind you of the basics and give you a few good tips along the way. And, remember that God has already made flowers incredibly beautiful.
All we have to do is gently place them in a different setting.

Types of Flowers: Tending toward the frugal side, I tend to use what I have readily available. Tomorrow I’ll cover cutting gardens, but use what is in abundance in your garden, in a nearby meadow, or whatever seems to be a good deal at the florist or supermarket. It’s also nice to have some greens of filler flowers to accent your primary flowers.

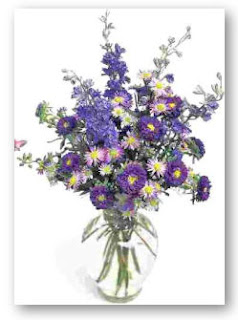
Vases and accessories: Anything that holds water is fair game. In addition to standard vases, I love using green Perrier water bottles, old lab ware, interesting votive holders, and mismatched china pieces such as sugar bowls or gravy boats. Use a clear vase or vessel when you are using flowers with beautiful, graceful stems, like calla lilies or tulips (see picture below).

Other tools: A knife, scissors, or shears that are really sharp (a sharp, even cut allows the flowers to absorb water and nutrients more efficiently). Also, floral foam and floral frogs are very useful for holding stems in just the right place. Personally, I usually prefer informal arrangements and rarely use them, but they are available from any good craft store. To keep stems in place when I’m in a hurry, I sometimes tie them together loosely with saran wrap.

Making your arrangement: After obtaining your flowers and selecting your vessel, remove any leaves that will fall below the waterline. This keeps the water and flowers fresher, longer. Also, re-cut the bottom of each flower stem on a diagonal just prior to placing them in the vase. I use floral food when I have it, and always pour a capful of hydrogen peroxide or a few drops of bleach into the water to help inhibit bacterial growth.

Next, think about what shape you would like your arrangement to be. Most arrangements tend to by pyramid shaped, especially for bouquets of more that one type of flower. Ball shaped arrangements are also common, especially for a uniformly shaped flower, such as roses or chrysanthemums.

Shorten the stems as needed to fit the general shape you have decided on. Make sure the flowers face outward, and at a pleasing angle for your shape. Use the largest flower along the bottom of your arrangement, and then work with one flower at a time, spreading each type of flower through out the arrangement. However, you may want to bunch together very small flowers of the same color, so that they can make more of an impact.

As you use up all of your flowers, fill up any remaining holes with greens. Make sure the greens don’t stick out; they should come to rest where the shape of your flowers ends.

Later in the week we will cover even simpler arrangements – arrangements with just a single flower, and arrangements made up entirely of foliage.

Tomorrow: Suggestions for growing a cutting garden and choosing color combinations for your arrangements.

Labels:

Friday, August 03, 2007

Finishing school coming to a blog near you...

Elizabeth (a different Elizabeth), of the Merry Rose, and Emma of Charming the Birds from the Trees, are running a Finishing School in blogdom this summer. They have recruited various guest “instructors” who are expected to write five blog entries during their assigned week in their area of expertise. Subjects include personal presentation, French and Asian culture, baking, needlework/sewing, gift giving, home keeping, and flowers. Guess who was asked to cover flowers?

Coming up with five consecutive entries in one week certainly will be challenging for me, given my past blogging track record. However, I'm hoping that this opportunity will help me become a lot more consistent.

So, come back each day next week, and learn about simple flower arranging, growing a cutting garden, flowers in the home, creating centerpieces, and herbal arrangements. And, feel free to leave comments or questions. I’d appreciate your input!

Labels:

Wednesday, August 01, 2007

Some things take so much longer than you think they will.

Last summer, after teaching one of my handmade paper making classes, I decided to come up with my own paper making kit that I could offer my students – since the ones commercially available tended to be either very expensive, or affordable but lacking in quality and durability.

I wanted nice pine frames for my mold and deckles, but I needed to find someone handier than I who could create the lap joint required for sturdy corners. My hope was to work with Inspiration Ministries’ sheltered workshop, but unfortunately despite all our attempts their clients weren’t quite able to manage the special lap joints. Hopefully I will be able to use them for a different project I have in mind for the near future, because they are an awesome ministry that I would love to be a part of.

At any rate, after coming to one dead end after another, I finally found a way to manufacture the pine frames, and the paper making kits are good to go. A year later! I was repeatedly reminded that when God closes one door, He opens another. Sometimes we have to learn the hard way.

The picture at the top is grass paper, made with recycled printer paper, and of course, grass! This recipe, as well as many other interesting papermaking recipes, hints and ideas, is included in the comprehensive instruction booklet that comes with the kit.

Labels: ,